
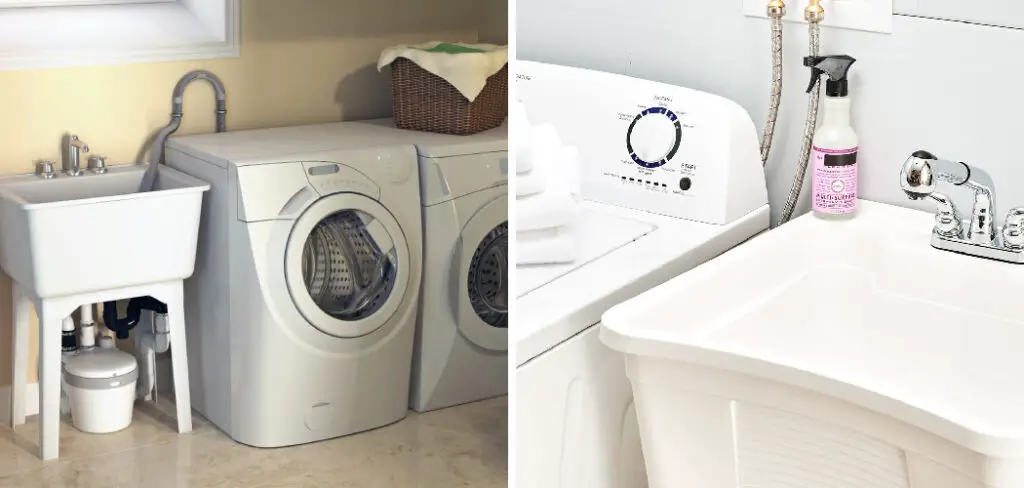
Installing a utility sink next to your washer can greatly enhance the functionality and convenience of your laundry area. Whether you need a dedicated space for handwashing delicate garments, cleaning muddy boots, or tackling other messy tasks, a utility sink provides the perfect solution.
This step-by-step guide will walk you through the process of how to install a utility sink next to washer, ensuring that you have all the necessary tools and materials at hand. From selecting the ideal location for the sink to connecting the plumbing lines, this article will provide you with the essential knowledge to complete the installation with ease.
With a well-placed utility sink, you’ll have a versatile and efficient workspace that simplifies your laundry routine and provides an additional cleaning station for a variety of household needs. So, let’s dive in and discover how to transform your laundry area into a multi-functional space.
Importance of a Utility Sink
A utility sink is a must-have for any laundry room or mudroom. Not only does it provide you with a convenient place for washing up and scrubbing small items, but it also helps to keep your main sink free from clutter and dirty items. Having a dedicated spot to wash clothes and mop the floor can save time and energy when doing home chores. Installing a utility sink next to your washer will make life much easier by bringing all of your cleaning needs into one area.
The advantages of having a utility sink in the same area as the washer are numerous. It allows you to easily transport large items such as buckets full of wet clothes or muddy boots directly from the washer to the sink without having to lug them across the house. Additionally, it serves as a convenient spot to pre-treat and soak difficult stains on clothing before you run them through the washer.
The sink can also be used for handwashing delicate items or smaller pieces of laundry like socks or lingerie that would otherwise get tangled up in the drum of the machine. And finally, having a utility sink next to your washer makes it easier for more than one person to do laundry at once by splitting up tasks between washing and rinsing.
Installing a utility sink next to your washer is an affordable and easy way to save yourself time and energy when doing household chores. It provides an efficient solution for tackling tough stains, handwashing delicate garments, and transporting large loads of laundry from the washer to the sink in one trip. With its multitude of uses, a utility sink is sure to be an invaluable addition to your laundry room.
Benefits of Having a Sink Next to Your Washer
Having a sink next to your washer offers many benefits to make laundry-time easier and more efficient. With a utility sink, you can save time by pre-treating stains before they go in the washing machine, soak delicate items that need special care, or filter out lint from clothes. Having warm water at your fingertips also makes it possible to rinse out hand-washed items quickly and efficiently.
Additionally, a sink allows you to treat fabric colors so that they last longer and look brighter. By having a separate basin for rinsing clothes, dirt won’t get transferred back into your washing machine after each laundering session. This helps prolong the life of both your washing machine and clothing items. Finally, having a utility sink next to your washer can help you save money on unnecessary water bills.

Instead of running a full load every time you need to rinse off an article of clothing, you can simply use the utility sink for quick rinsing and spot-treating tasks. Plus, the extra counter space next to the sink is great for other laundry activities such as sorting clothes or folding laundry items. With all these benefits in mind, it’s no surprise that many homeowners are choosing to install a utility sink next to their washing machine.
Building the perfect laundry room requires some careful planning and knowledge – but with enough preparation and guidance, having a utility sink installed near your washer doesn’t have to be difficult! To learn more about how you can install a sink next to your washer, read on for step-by-step instructions!
10 Steps How to Install a Utility Sink Next to Washer
Step 1: Gather the Necessary Tools and Materials
Before you begin the installation process, make sure you have all the tools and materials you’ll need. This includes a utility sink kit (which typically includes the sink, faucet, drain assembly, and mounting hardware), a pipe wrench, adjustable pliers, a bucket, a level, a tape measure, a pencil, a drill, a jigsaw, pipe fittings, PVC pipes, pipe primer, pipe cement, Teflon tape, and a wrench.
Step 2: Choose the Location
Carefully select the ideal location for your utility sink. It should be close to your washer for easy access to water and drainage lines. Additionally, consider nearby electrical outlets and ensure there is enough space for the sink and any necessary plumbing connections. If you plan to install a counter over your sink, make sure the area is wide enough for proper installation.
Step 3: Shut off the Water Supply
Before you start any plumbing work, shut off the water supply to your washer. Locate the shut-off valves on the water supply lines and turn them clockwise until they are fully closed. Open the faucets to relieve any remaining pressure in the lines. Now you are ready to begin installing your utility sink. However, if you are unsure of how to shut off the water supply properly, it is best to contact a professional plumber for assistance.

Step 4: Remove the Washer Hose
Disconnect the hoses that connect your washer to the water supply lines. Place a bucket underneath to catch any water that may spill out. Use adjustable pliers to loosen the hose connections, and once loose, carefully detach the hoses. Make sure to keep the hose connections in a safe place, as you will need them when you attach the utility sink.
Step 5: Prepare the Area
Clear the area around the selected location for the utility sink. Remove any obstacles or existing cabinets to create enough space for the sink. Measure the dimensions of the sink and mark the outline on the wall with a pencil. To ensure accuracy, use a level to make sure the lines are straight and even. Though not necessary, it may also help to draw a picture of the finished product.
Step 6: Cut an Opening for the Sink
Using a drill, create pilot holes in the corners of the marked outline. Then, use a jigsaw to carefully cut along the marked lines. Take caution to avoid any electrical wires or plumbing pipes hidden within the wall. However, if you do encounter obstacles, use a reciprocating saw to cut them away.
Step 7: Install the Sink Support Bracket
Attach the sink support bracket to the wall studs using screws. This bracket will provide stability and support for the sink. Ensure that the bracket is level and securely fastened. Though it may be tempting to skip this step, the sink support bracket is an important element in the installation process.

Step 8: Connect the Drain Assembly
Install the drain assembly according to the manufacturer’s instructions. Apply Teflon tape to the threaded connections to create a watertight seal. Use a wrench to tighten the connections, ensuring they are snug but not overly tightened. Connect the drain hose from the washing machine to the drain line of the utility sink.
Tighten all connections with a wrench and test for any leaks. If any leaks are present, tighten the connections further. Finally, turn on the water supply to both the washing machine and utility sink and test for any leaks.
Step 9: Connect the Faucet and Water Supply Lines
Install the faucet according to the manufacturer’s instructions. Connect the water supply lines to the faucet, again using Teflon tape on the threaded connections. Tighten the connections with adjustable pliers, ensuring they are secure. Turn on the water supply and check for leaks. If there are any, tighten the connections further or ensure that Teflon tape is properly applied.
Step 10: Connect the Sink to the Drain and Water Supply
Position the utility sink over the support bracket and align it with the opening in the countertop. Connect the drain assembly to the sink’s drain outlet and secure it using the provided hardware. Connect the water supply lines to the faucet, ensuring they are tight and leak-free.

Conclusion
Installing a utility sink next to the washer is certainly not an easy task but it can be made simpler with the right tools and techniques. It’s crucial to take as many steps as you can to ensure that you install the utility sink properly so that it won’t cause any damage later on. To help further, consult local plumbing experts and take into account local building codes before beginning your project.
In conclusion, if you are interested in installing a utility sink next to your washer, following these steps should provide a great foundation for your project. Doing so may seem intimidating at first, but with careful research and planning, you’ll be able to DIY this project like a pro! So don’t put it off any longer – head out to your hardware store today and get started on how to install a utility sink next to washer!
you Can Also Check This Out to Run Electrical Wire in Unfinished Basement