
Installing ceiling tiles in the basement of your home can have several benefits. It can help improve insulation, reduce sound echoing, and even provide a more aesthetically pleasing look. Installing ceiling tiles is also relatively easy, making it an ideal DIY project for many people. With a few basic supplies and some patience, you can quickly and easily install ceiling tiles in your basement to improve the look and feel of the space.
Installing ceiling tiles in a basement provides many advantages. The added insulation helps to keep the area cooler and quieter, helping to improve the comfort level of people living there. Also, properly installed ceiling tiles can reduce noise from outside sources, such as passing cars or construction work. In this blog post, You will learn in detail how to install ceiling tiles in basement.
Tools You Will Need
- Measuring Tape
- Level
- Pencil or Marker
- Step Ladder
- Drywall saw
- Utility knife
- Hammer
- Nails or screws
- Tin snips
- Tile adhesive
- Tile/ceiling grid kit
- Ceiling tiles
Installation of ceiling tiles for a basement can be a rewarding and fairly easy task. Be sure to have all the necessary tools and materials before beginning.
Step by Step Processes for How to Install Ceiling Tiles in Basement
Step 1: Inspect the Existing Ceiling
Before starting the installation process, it is important to inspect the existing ceiling in your basement and make sure that it is properly supported and in good condition. Clean out any debris and dirt before beginning installation. Next, measure the area of your ceiling where you want to install the tiles and plan for how many tiles you will need.

Step 2: Install Suspension System
The next step is to install the suspension system. This includes mounting a track or grid along the walls and ceiling, depending on what type of tile you are using. Make sure that you use screws that are made for drywall only, as any other type of screw can cause damage to the ceiling tiles.
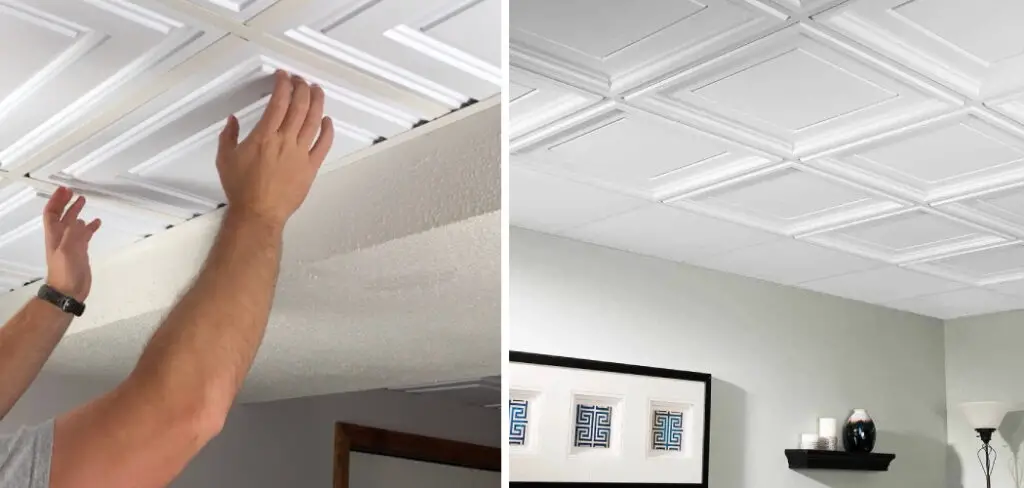
Step 3: Install Tiles
With the suspension system in place, you can now begin installing your ceiling tiles. Start at one corner and work across the room, ensuring each tile is properly secured with screws or nails. To give a more finished look, you may want to hide the edges of the tiles. This can be done with adhesive or caulk to cover up any seams.
Step 4: Install Lighting
Once all of your ceiling tiles are installed, it is time to install lighting fixtures. Depending on what type of lighting you have chosen, this process will vary slightly. Most basements require a ventilation system to reduce the chances of mold and mildew. Ensure you install this before finishing any other projects in the area.
Step 5: Paint or Stain Ceiling Tiles
Depending on the type of ceiling tiles you choose, you may want to paint or stain them. This can help to give the room a more finished look and provide extra protection against dirt, dust, and moisture. To ensure that all of your hard work lasts, seal any edges where two tiles meet with caulk or adhesive. This will prevent moisture infiltration, which can cause damage over time.
Step 6: Final Touches
Finally, you can add any other decorative touches that will help make your basement look great. This could include adding trim around the edges of the ceiling tiles or changing out hardware, like switch plates and door handles.

With all of these steps completed, your ceiling should look great and be ready for use.
Safety Tips for How to Install Ceiling Tiles in Basement
- Wear protective clothing and safety goggles while cutting ceiling tiles to avoid injury from flying debris.
- Avoid using an angle grinder or a saw – use manual cutters instead, as these tools can be very dangerous when working in enclosed spaces.
- Ensure the basement area is well-ventilated to prevent inhaling any toxic fumes from the tiles or glue.
- Place a drop cloth on the floor to protect it from scratches, spills, or debris while working.
- Make sure that your ladder is sturdy and secure before climbing it to reach higher areas of the ceiling installation.
- Keep an eye on exposed wires, and do not cover them with tiles, which could lead to electrocution.
- Use a mask and gloves when handling adhesive or glue for the ceiling tiles to avoid skin irritation or inhaling toxic fumes.
These safety tips are important to consider before installing ceiling tiles in a basement. Following these tips can help prevent accidents and injuries while ensuring that the job is done correctly.

What is the Best Way to Clean and Maintain Ceiling Tiles in a Basement?
Ceiling tiles in a basement can be susceptible to dirt, dust, and other debris. To keep them looking like new, it is important to keep them clean and maintain them properly. Here are some tips on how to best clean and maintain ceiling tiles in a basement:
- Start by sweeping or vacuuming the surface to remove any dirt or dust.
- Next, use a damp cloth and mild detergent to scrub the surface of the tiles gently. Be sure not to scrub too hard, as this can damage the tile’s finish.
- Allow the tiles to dry completely before applying any cleaning products or sealers that you may be using.
- If you are using a sealer, make sure to apply it evenly to the tiles and allow it to dry according to the instructions on the product.
- Once your tiles are sealed, dust them regularly using a soft cloth or vacuum attachment. This will help prevent dirt and dust buildup and help keep the tiles looking great.
By following these tips, you can ensure that your ceiling tiles in a basement will stay clean and well-maintained for years to come. With proper cleaning and maintenance, you can ensure that your ceiling tiles look their best and remain in good condition.
Are There Any Common Mistakes That Should Be Avoided While Installing Ceiling Tiles in a Basement?
Yes, a few common mistakes should be avoided when installing ceiling tiles in a basement. One of the most common oversights is failing to prepare the ceiling surface properly before installation. Proper preparation involves cleaning and leveling the surface to ensure the tiles adhere securely and lay flat on the ceiling.
Another mistake to avoid is not using the correct adhesive when installing ceiling tiles. Using the incorrect type of adhesive or applying the adhesive incorrectly can cause the tiles to come loose over time. Lastly, it is important to check for existing damages, such as mold and mildew, before installing your ceiling tiles to ensure a successful installation that will last for years to come.
How Long Does It Typically Take to Install Ceiling Tiles in a Basement?
Installing ceiling tiles in a basement typically takes between one to two hours, depending on the room’s size and the installation’s complexity. It is important to ensure that all materials are of good quality and properly measured before starting any installation project. When installing ceiling tiles in a basement, checking for any water seepage or damage before beginning the installation is essential.
For a straightforward installation, it is recommended to use standard 2’ x 4’ ceiling tiles and appropriate adhesive or screws to attach them securely. The first step is to prepare the substrate by cleaning and leveling the surface, then attaching furring strips if necessary.
It is also important to make sure the ceiling tiles are cut to fit perfectly before attaching them. When installing the tiles, ensure each one is fully seated in place, and the edges are sealed with adhesive or sealant. Once complete, check for any gaps or inconsistencies and fill in as necessary.
Is It Possible to Install Ceiling Tiles in a Basement Without Professional Help?
Yes, installing ceiling tiles in a basement without professional help is possible. However, there are certain steps you need to take and some additional tools that may be required before starting the actual installation process.

Before installing ceiling tiles in your basement, ensure the area is clean and free of debris or hazards such as wires, pipes, or other objects that could cause potential damage. Once you have ensured the area is safe and clear, you must decide which type of ceiling tile to install.
Acoustic ceiling tiles are a popular basement choice because they provide sound absorption and help reduce noise levels. Additionally, acoustic tiles can be installed with minimal effort and are available in various sizes and colors.
Before installing, make sure the tiles are designed to fit in your space. The next step is to prepare the area for tile installation. Ensure that your walls and ceiling are dry, level, and free from excessive dust or debris. Once this is done, you must use an adhesive to secure the tiles.
Conclusion
In conclusion, installing ceiling tiles in the basement does not have to be a difficult task. With the right tools and materials, creating a beautiful look in any space is possible. The most important thing to remember is that the individual tile pieces must be properly secured, paying special attention to corners and edges.
Additionally, if any walls need to be covered, wall-mounted tiles can easily be installed. With the right approach to installation, anyone can create their own beautiful ceiling tile in any basement area. I hope this article has been beneficial for learning how to install ceiling tiles in basement. Make Sure the precautionary measures are followed chronologically.
